Friday, July 20, 2012

Gorditas de Pollo

This is one of the dishes my kids loves to eat all the time. I also love them because they are very easy to make and I can filled them up with so many different fillings. This time I will share with you my recipe for "Chicken Gorditas."

The gorditas are made with corn masa, I use Maseca which you can find at most of the super markets in the flour section. Following the instructions in the package I mixed 4 cups of corn flour (Maseca) with 2 1/2 cups of chicken broth mixed with some salsa. I use the chicken broth I have left after broiling the chicken breast I will use as the filling because I like the corn masa (flour) to have some flavor.
After mixing the corn flour with the chicken broth I started to form the gorditas by grabbing some masa and pressing it down with my hands to create a thick flat tortilla shape. They have to be thick because we will cut them from the side to fill them up with the chicken. I do not fry my gorditas, I prefer to put them in a very hot skillet and take them out when they are toasted in both sides. You need to turn the gorditas in both sides in the hot skillet. When they are done take them out and carefully cut them on the side with a knife only half way.

For the chicken filling I broiled 3 chicken breasts and cut the chicken in small pieces after cooked. In a hot skillet I added some olive oil with 3 cut plum tomatoes, 2 small onions and one serrano pepper. When the vegetables start to soften up I added the chicken and mixed them together. You can add salt and pepper to your taste.


Now you are ready to fill the gorditas and ENJOY !!!! You can also add some fresh salsa and sour cream when you serve them.

My kids also love when I just filled them up with cheese or a delicious mixture of poblano peppers, onions and cream. The combinations are endless and you will love to eat them too.

Tuesday, February 7, 2012

Matambre Gringo Style (a lo Gringo digamos)

Matambre is one of the traditional Argentinean beef dishes, some say the name comes from the contraction and combination of two words "Mata" (Kill) and "Hambre" (Hunger), anyway it is just a particular cut of meat that we can cook in different ways and styles. The most common recipe is for a stuffed rolled matambre.


El Matambre es uno de los platos tradicionales de carne en Argentina, algunos dicen que el nombre proviene de la contracción y combinación de las palabras "Mata" y "Hambre", de todos modos es simplemente un corte de carne que podemos cocinar de distintas formas y estilos. La receta más común es la del matambre relleno arrollado.

Source: (C) National Live Stock and Meat Board

The cut is from the bottom area and attached to the lower section of the ribs, it is slightly different in the United States where a similar cut is called "Flank Steak". Some people confuse this cut with the "Skirt Steak" or as they call it in Mexico "Fajitas". No, "Flank Steak" and "Skirt Steak" are not the same cut but they are from the same area.


Source: Instituto de Promoción de la
Carne Vacuna Argentina

El corte es de la parte inferior que se encuentra adherida a la sección baja del costillar, es ligeramente diferente en Estados Unidos donde a un corte similar se lo llama "Flank Steak." Algunas personas confunden este corte con el "Skirt Steak" que en México son las "Fajitas", estos son cortes distintos pero se obtienen de la misma área.


There are different ways to prepare the stuffed rolled flank steak, I'll share with you one of the ways we do it at home.

Existen diferentes formas de preparar el flank steak relleno y arrollado, voy a compartir con ustedes una de las formas en la que lo preparamos en casa.

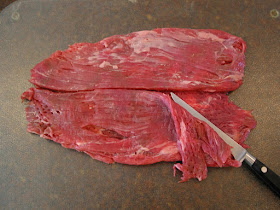
Cut the flank steak in butterfly style.

Cortar el flank steak en estilo mariposa.


Tenderize a little bit with an appropriate mallet.

Tiernizar ligeramente con un martillo apropiado.

Spread fresh chopped garlic and italian parsley, and season with a little bit of salt, black and red pepper.

Untar con ajo y perejil frescos picados, sazonar con un poco de sal, pimienta negra y roja.


Make a layer with some bacon strips and grated cheeses. Some people use gelatin powder instead of cheese, I prefer cheese.

Hacer una capa con unas tiras de tocino y queso rallado. Algunas personas utilizan polvo de gelatina en lugar de queso, yo prefiero el queso.


Now make a layer with plenty of fresh spinach, carrots and hard boiled eggs cut in half. Add more seasoning.

Ahora hacer una capa con un bastantes hojas de espinacas frescas, zanahorias y huevos duros cortados por la mitad. Agregar más condimentos a gusto.


Roll the matambre and close (not too tight) with cooking twine.

Enrolle el matambre y cerrar (no muy fuerte) con hilo para cocinar.


When finished it has to look more or less like this picture. I normally let it rest for few hours or overnight in the refrigerator wrapped with plastic foil.

Cuando haya terminado se tiene que ver más o menos como esta imagen. Yo normalmente lo dejo reposar en el refrigerador durante unas horas o toda la noche envuelto en plástico.


To cook first seal on hot iron pan with olive oil, onions and peppers, from there take to the oven (400 °F) to finish cooking on a recipient filled with beer until internal temperature reaches over 165 °F , keep it moist, add more beer
if needed.


Para cocinar, primerero se sella en una sartén de hierro caliente con aceite de oliva, cebollas y pimientos, luego se pasa a un recipiente con cerveza para terminar de cocinar en el horno  (200 °C)  hasta que la temperatura interior llegue  a más de 74  °C . Evitar que se seque agregando más cerveza si es necesario.


This is a very traditional dish in Argentina for the holidays and we often serve it as a cold meat with a potatoes and veggies salad that we call "Ensalada Rusa", you can also cut it in thin slices and use for sandwiches or just finish to cook it on a grill.

Este es un plato muy tradicional en la Argentina para las fiestas, que a menudo servimos como plato frío acompañado de una ensalada de papas con verduras que llamamos "Ensalada Rusa", también se puede rebanar en rodajas finas y usar como fiambre para sandwiches, o terminar de cocinar a la parrilla.


Buen Provecho
Jorge


Pin It

Tuesday, January 31, 2012

Plate of the day: Polenta with meat sauce and french green beans

I confess, we are carnivores at home, but meat doesn't need to be always the primary ingredient on a meal. Once in a while on Saturday mornings we visit the Farmers Market at the Pearl Brewery, besides getting fresh veggies (we love fresh mushrooms), we always look for grass fed beef, not cheap but worth the money.


Last time I purchased some skirt steak, NY strip and a cut for beef stew. This last cut was not more than a pound, but good enough for a good meat sauce. So today we put together some polenta with a hearty home made meat sauce, and following a good diet guided by my beloved wife as a side we included some sauté French green beans.

Stuff I used today, well lets say ingredients:


  • 1lbs of beef stew cut in small cubes
  • 1/2 chopped white onion
  • 2 chopped romano tomatoes
  • 2 packs (18oz) of traditional Italian pre-cooked polenta
  • 2 cans (8oz) tomato sauce not salted
  • 2 or 3 cloves of garlic (chopped very small)
  • 1lbs of French green beans
  • Grated cheese a piacere (please not yellow cheese)

Lets start with the easy part. Since we are going to sauté the green beans, first on a medium sauce pan put water to boil, and also get ready a bowl or other recipient with ice cold water. We are going to clear the green beans, as soon as the water is boiling, drop the green beans on the pan and leave them for few minutes, we don't want to cook them all way through, then take out the green beans and put them in the cold water to stop the cooking and then on a strainer to remove the water.

In parallel, put olive oil in a skillet or frying pan and also on a sauce pan. When the oil is hot put the meat on the skillet and the chopped onions on the sauce pan. We are going to just seal and brown the meat on the skillet, it will finish to cook in the sauce. When the onions start to get tender drop the chopped tomatoes, make sure they start to cook evenly with the help of a wooden spoon, and after few minutes pour the contents of the tomato sauce cans on the pan.

Season the meat with some salt and pepper (we regularly use coarse kosher salt), also season the sauce with salt, pepper, and other species you like, I used some paprika, a little bit of crushed laurel leaves and a tiny bit of sage.
When the meat is all brown transfer the meat and all the juices to the sauce pan, if the sauce looks too dense you can add some beef broth or plain water, let it simmer with a gentle fire.

Preheat the oven to 475F and cut the polenta in slices of about 1/3".

When the sauce is ready (about 20-25 minutes) start scooping some sauce out of the pan (leave the meat in there) and arrange the polenta in layers with the sauce and cheese. Today I used an Italian blend of cheeses with mozzarella, asiago, romano and parmessan, and some monterrey jack. When you are done layering the polenta slices top with more cheese and put in the oven for few minutes to create a gratin with cheese.

While you are waiting for the cheese to melt, heat some olive oil in a sauté pan, put the chopped garlic on the pan, stir with a wooden spoon and for two minutes let the oil absorb the flavor from the garlic, then drop the green beans on the pan and sauté them. Pay attention and make sure you are not burning the garlic.


When the cheese is fully melted take the polenta out of the oven and top with the rest of the sauce and the meat. And we are ready to serve !!

Bon appetit 

Monday, January 30, 2012

Lorena's Corn Muffins

I love eating corn, it is a big part of my culture and these delicious muffins are one of the favorite treats in my home.
My recipe has ham in the ingredients but you can omit the ham if you do not eat meat. 


Lorena's Corn Muffins


INGREDIENTS:


1        Cup of Cornmeal
1        Cup of All-purpose flour
2        tsp. Baking powder
1/4     tsp. Baking soda
1/2     tsp. Red pepper flakes
1/2     tsp. Salt (or to taste)
1 1/2  Cups of Buttermilk
1        Egg
4        tbs. Butter (melted)
1        Can(11oz) Mexicorn (Green Giant)
1/2     Onion (chopped)
5        Slices of Ham (chopped)
1 1/2  Cup of Mozzarella Cheese (shredded) 


Mixed all the ingredients with a wooded spoon and put your oven at 400F. Greased the muffin molds and add the mixture into each of the muffin molds.
Bake for 20 minutes or until the muffins have a golden color.
Let the muffins in the muffins pan for almost 5 minutes before you take them out.


Enjoy !!!


Love,
Lorena Angulo


Wednesday, January 25, 2012

Chicken Tostadas (My Style)

Hola my friends !!! Here I am again sharing a very easy and delicious recipe I always make to my kids. They love to eat them and they are YUMMY !


                                       CHICKEN TOSTADAS


Ingredients 
Shredded Chicken
Refried beans
Mixed veggies (cooked)
Tostadas
Salsa (optional)
Cream (Mexican or Sour) 

1- Spread some beans in the tostada
2- Add some shredded chicken
3- Mixed cooked veggies
4- Cream and Salsa

To make the salsa it is also very simple, I just boiled tomatoes( I mixed some red and tomatillos this time) and serranos (as many as you want.)
When my serranos and tomatoes are boiled and use my blender to mix them together. In the blender I add salt, pepper, lime juice and some olive oil.

Pin It


Provecho !!! ♥

Love,
Lorena

Tuesday, January 17, 2012

Papas Noisette or Pommes de terre Parisiennes

If there is any vegetable that we all love in our house it is potatoes, any type, any style, our daughter would be happy if we just feed her mashed potatoes or french fries all the time. But after a while you may get tired to eat the same style over and over, so here is an alternative way of preparing potatoes. It takes a little more time for preparation but they look fantastic and taste great, and are a good companion for meat dishes.


Some people call them Pommes Noisettes, which means "hazelnut" in French, others just Parisiennes derived from the name of the melon baller tool called cuillère parisienne or parisian spoon.


For 4 to 6 portions I used two large potatoes, get the ones used for baking which are more floury and get crisper than the waxy ones. I cut them by half on the large side to make them more easy to handle, then start to scoop out the potato "balls" and put them on iced cold water. Don't worry if you don't get perfect spheres and the left over, don't trash it, I'll tell you what to do later.
If you don't have a clue about how to use the baller tool watch this video, it is in French but you will get the picture.


Preheat the oven to about 400 F. When you have the little potato balls ready, take them out of the cold water, dry them, while you start melting two tablespoons of butter and a little bit of olive oil on an oven proof skillet.


Sauté the potatoes on the butter for about 3-4 minutes, and then put the skillet in the oven for about 20 to 30 minutes until they are tender and golden brown. Before serving season with salt and fresh black pepper and sprinkle with parsley flakes.


What to do with the potato scraps ? Just chop them in little pieces, chop half an onion and put them to caramelize in a medium size skillet with the little bit of olive oil, when they start to get clear drop the potato pieces and mix with the onions, on a bowl beat four eggs, season with salt and pepper and drop on the skillet. Mix for few minutes and then transfer to the oven to finish cooking.


You just made a quick and easy Potato Frittata :-)


Buon Mangiare
Giorgio (as my grandpa use to call me)

Friday, January 13, 2012

Lorena's Green Salsa Chicken Tamales

This is a recipe I have been making for a long time and my family always ask me to make them, my son Christian is a big fan of my tamales. ;o)
I am happy to share my recipe with all of you.


Tamales are made from masa dough filled with meat and vegetables or fruit and wrapped in a corn husk or banana leaves and steamed.


Ingredients :

Lorena's Green Salsa Chicken Tamales

8 cups of Maseca corn masa mix.
8 cups of chicken broth mixed green salsa.
1 1/2 cup of CRISCO vegetable shortening.
2 bottles of green salsa.
2 Tsp. Baking powder.
1 Bag of corn husks.
10 to 15 Chicken legs or 1 1/2 Rotisserie chicken.
1 Jar of pimiento stuffed olives.
1 cup of raisins.
Olive oil.
Salt.


Soak the corn husks in warm water until soft
If you choose to boil in water the chicken legs, take the legs out of the broth and save the liquid to use in the corn masa mixture.
In a mixing bowl, blend the Maseca corn masa mix, crisco vegetable shortening, warm chicken broth with green salsa, baking powder and salt to taste.
You will obtain a consistent mixture and the corn masa will be soft.
In a pot with some olive oil add the shredded chicken, a bottle of green salsa, olives and raising.
Add some chicken broth and salt if needed. 


Spread the masa evenly over the corn husk, after that you have to add some of the chicken mixed with olives and raisins on top of the masa.
Fold the sides of the corn husk to center over the masa so that they overlap to make a package(tamale.) Fold the empty part of the husk under so that it rest against the side of the tamale with a seam.

Place the tamales in a steamer and cook them for about 35 to 40 minutes. The tamales will be cooked when they separate easily from the corn husk.


Enjoy !!!! ;-)
Love,
Lorena 

Baking bread ... Very simple recipe


If you visited my Picasa Web Albums or my timeline on Facebook, you probably noticed that I really enjoy cooking. The passion for food and cooking seems to be in our family's genes, my dad is passionate about it, and let me tell you he is an amazing cook, for some time he had a small deli in Buenos Aires. My two brothers are also masters in the kitchen, they both went to culinary schools, and my youngest brother still works at a pasta factory. When I was a bambino my grandma with her cousins owned one of the best and most traditional Italian restaurants in downtown Buenos Aires (Il Napoli, across the Luna Park stadium).

My grandparents were from Italy, and I remember when we all got together every Sunday for the classic Italian family feast. The process started early in the morning since everything was home made from scratch, the breads, antipasto, spaghetti, ravioli, meats, salads, desserts, well you get the picture.

When I get on the kitchen to cook, it is like therapy, it lets me disconnect from the brain intensive geeky programming or electronics design work I do. It also brings back those pleasant memories of my family and those fantastic Sunday meals.

If there is something that I always die for is good bread, better said, artisan breads, in particular Italian and French breads. I won't deny that some of the chain or supermarket bakeries have good products, but there is nothing better and close to an artisan bread that the one home made with your own hands.

To make some basic breads the process is very simple and with few steps, measure, mix, knead, raise, punch, form, proof, bake, cool, eat.

I won't get too much on the details and basic concepts and techniques of bread making but I'll recommend you one of my favorite books:


Ultimate Bread
by Eric Treuille & Ursula Ferrigno
What is interesting is that while the book is printed in Great Britain, Eric was born in France and he started very young working at his uncle's boulangerie (bakery shop), and Ursula was born in Italy and grew up on her father's farm in southern Italy.

The book takes you from the fundamentals of breadmaking and the essentials techniques with plenty of  great pictures and includes over 100 recipes for many different types of breads.


Wanna get started ? Nothing better than a simple recipe to make a plain bread, what in France is called Pain Ordinaire or Pane Rustico in Italy.


What do you need:
  • 1 small pack (4oz) or 2tsp of dry yeast
  • 1 1/2 cups of water
  • 3 1/2 cups of unbleached bread flour
  • 1 1/2 tsp salt
What to do:


You obviously start by measuring and mixing the ingredients.


On a measuring cup put about 1/8 cup (125ml) of warm water and sprinkle the yeast in. If the ambient temperature is too low you can drop a little pinch of sugar to get the yest fermentation process going, stir until the yeast is dissolved and put away for 5-10 minutes.


Meanwhile mix the flour and salt in a bowl, you will get better results if you stiff the flour before.


Make a well like a crater in the center of the flour and pour the dissolved yeast.
With a wooden spoon start mixing slowly some of the flour on the side until you have a creamy gooey paste combining the dissolved yeast with the surrounding flour.


This is called "the sponge method."
Now cover the bowl with a kitchen towel and put away for about 20 minutes.


You will notice that the yeast and flour gooey expanded and became frothy with some holes from bubbles created by the yeast.


Very gradually and mixing with the wooden spoon start incorporating the rest of the water into the center and mix the flour from the side, it will slowly start to form a moist dough.
If you need to add more water to get a firm dough, add one tablespoon at a time. 


Don't worry if the dough is sticky and look very moist, its better to have a moist dough than a dry dough.
Time to put some muscle. Take out the dough from the bowl into a lightly floured surface, go easy with the flour since we are only using it to have a non stick surface so we can knead the dough.


Knead for 10 minutes, if you feel that the dough is too difficult to handle, knead for 5 minutes, let it rest for 5 minutes and knead for another five, until you get a smooth and elastic dough.
When you are done kneading, put the dough ball on a clean bowl, cover with a kitchen towel and put on a warm place (not hot !! we don't want to cook it).


We'll let it rise until it doubles in size, depending on temperature and other conditions it make take about  1 1/2 to 2 hours. 
Magic !! now we have twice or more the original size, but full of bubbles.


Very gently make a fist and with your knuckles slowly punch down the dough to release some of the gas that formed inside.


After you punch it down let it rest for 10 minutes.


Now is time to give our bread some form, in this case we will do a long wide loaf.


Take the dough out of the bowl, gently spread forming sort of a rectangle and fold from the side 1/3 to the center.
Now fold the other side to the center.


Very gently with your palm start pressing to seal the two folds in the middle.


Then with your thumbs create a small indentation in the middle to finish sealing the union.
Turn the loaf over and with your hands keep forming the loaf extending until it gets to about 15" long. Put the shaped loaf on a floured baking pan, cover with a dish towel and let it proof until it doubles in size.


It may take 30 to 45 minutes. Depending on how long it takes your oven to warm up, you can start preheating it to 425 F.


An easy way to determine if the proofing is done, is to push gently with your finger the center of the loaf, if the dough springs back slowly you are golden, if it is too firm bad luck but don't worry it is still edible, but don't over proof it, it is preferred to put it early than late in the oven.


Before you put the loaf in the oven, cut some slashes on the top, it is not just for decoration, it helps the dough to expand without generating cracks on the sides or the bottom. Put it in the oven and let it bake until golden (30-45 minutes).


Don't open the oven every five minutes !!!


When I do this type of rustic breads I like to use a nice trick to create some additional moisture and obtain a more crunchy crust, open the oven and spray the loaf with a mist of salty water.


Let the loaf fully cook. Uncooked bread can give you an indigestion.
An easy trick for this type of breads to find out if they are cooked or not, is to turn them over and knock in the underside, if it sounds like nobody is home (slightly hollow) your bread is done.

When you take it out of the oven let it cool on a wire rack or grill, if you leave it in a flat surface the bottom will become soggy.

WAIT !! until it cooled down to cut.


Voilà, you just made your first Pain Ordinaire.


Enjoy !!
Jorge